(Sponsors) Get started learning Python with DataCamp's free Intro to Python tutorial. Learn Data Science by completing interactive coding challenges and watching videos by expert instructors. Start Now!
Sending Emails in Python - Tutorial with Code Examples
Updated on Jan 07, 2020
What do you need to send an email with Python? Some basic programming and web knowledge along with the elementary Python skills. We assume you’ve already had a web app built with this language and now you need to extend its functionality with notifications or other emails sending. This tutorial will guide you through the most essential steps of sending emails via an SMTP server:
- Configuring a server for testing (do you know why it’s important?)
- Local SMTP server
- Mailtrap test SMTP server
- Different types of emails: HTML, with images, and attachments
- Sending multiple personalized emails (Python is just invaluable for email automation)
- Some popular email sending options like Gmail and transactional email services
Served with numerous code examples!
note:
Written and tested on Python 3.7.2.
Sending an email using an SMTP #
The first good news about Python is that it has a built-in module for sending emails via SMTP in its standard library. No extra installations or tricks are required. You can import the module using the following statement:
import smtplib
To make sure that the module has been imported properly and get the full description of its classes and arguments, type in an interactive Python session:
help(smtplib)
At our next step, we will talk a bit about servers: choosing the right option and configuring it.
An SMTP server for testing emails in Python #
When creating a new app or adding any functionality, especially when doing it for the first time, it’s essential to experiment on a test server. Here is a brief list of reasons:
- You won’t hit your friends’ and customers’ inboxes. This is vital when you test bulk email sending or work with an email database.
- You won’t flood your own inbox with testing emails.
- Your domain won’t be blacklisted for spam.
Local SMTP server #
If you prefer working in the local environment, the local SMTP debugging server might be an option. For this purpose, Python offers an smtpd module. It has a DebuggingServer feature, which will discard messages you are sending out and will print them to stdout. It is compatible with all operations systems.
Set your SMTP server to localhost:1025
python -m smtpd -n -c DebuggingServer localhost:1025
In order to run SMTP server on port 25, you’ll need root permissions:
sudo python -m smtpd -n -c DebuggingServer localhost:25
It will help you verify whether your code is working and point out the possible problems if there are any. However, it won’t give you the opportunity to check how your HTML email template is rendered.
Fake SMTP server #
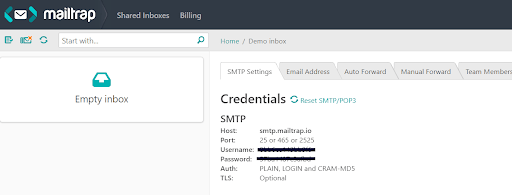
Fake SMTP server imitates the work of a real 3rd party web server. In further examples in this post, we will use Mailtrap. Beyond testing email sending, it will let us check how the email will be rendered and displayed, review the message raw data as well as will provide us with a spam report. Mailtrap is very easy to set up: you will need just copy the credentials generated by the app and paste them into your code.
Here is how it looks in practice:
1 2 3 4 5 | import smtplib
port = 2525
smtp_server = "smtp.mailtrap.io"
login = "1a2b3c4d5e6f7g" # your login generated by Mailtrap
password = "1a2b3c4d5e6f7g" # your password generated by Mailtrap
|
Mailtrap makes things even easier. Go to the Integrations section in the SMTP settings tab and get the ready-to-use template of the simple message, with your Mailtrap credentials in it. It is the most basic option of instructing your Python script on who sends what to who is the sendmail() instance method:

The code looks pretty straightforward, right? Let’s take a closer look at it and add some error handling (see the #explanations in between). To catch errors, we use the “try” and “except” blocks.
1 2 3 4 5 6 7 8 9 10 11 12 13 14 15 16 17 18 19 20 21 22 23 24 25 26 27 28 29 30 31 32 33 34 35 | # the first step is always the same: import all necessary components:
import smtplib
from socket import gaierror
# now you can play with your code. Let’s define the SMTP server separately here:
port = 2525
smtp_server = "smtp.mailtrap.io"
login = "1a2b3c4d5e6f7g" # paste your login generated by Mailtrap
password = "1a2b3c4d5e6f7g" # paste your password generated by Mailtrap
# specify the sender’s and receiver’s email addresses
sender = "from@example.com"
receiver = "mailtrap@example.com"
# type your message: use two newlines (\n) to separate the subject from the message body, and use 'f' to automatically insert variables in the text
message = f"""\
Subject: Hi Mailtrap
To: {receiver}
From: {sender}
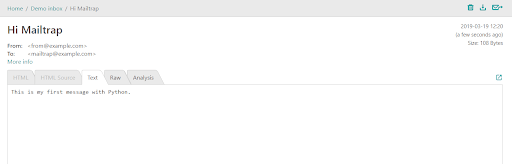
This is my first message with Python."""
try:
#send your message with credentials specified above
with smtplib.SMTP(smtp_server, port) as server:
server.login(login, password)
server.sendmail(sender, receiver, message)
# tell the script to report if your message was sent or which errors need to be fixed
print('Sent')
except (gaierror, ConnectionRefusedError):
print('Failed to connect to the server. Bad connection settings?')
except smtplib.SMTPServerDisconnected:
print('Failed to connect to the server. Wrong user/password?')
except smtplib.SMTPException as e:
print('SMTP error occurred: ' + str(e))
|
Once you get the Sent result in Shell, you should see your message in your Mailtrap inbox:
Sending emails with HTML content #
In most cases, you need to add some formatting, links, or images to your email notifications. We can simply put all of these with the HTML content. For this purpose, Python has an email package.
We will deal with the MIME message type, which is able to combine HTML and plain text. In Python, it is handled by the email.mime module.
It is better to write a text version and an HTML version separately, and then merge them with the MIMEMultipart("alternative") instance. It means that such a message has two rendering options accordingly. In case an HTML isn’t be rendered successfully for some reason, a text version will still be available.
Input:
1 2 3 4 5 6 7 8 9 10 11 12 13 14 15 16 17 18 19 20 21 22 23 24 25 26 27 | import smtplib
from email.mime.text import MIMEText
from email.mime.multipart import MIMEMultipart
port = 2525
smtp_server = "smtp.mailtrap.io"
login = "1a2b3c4d5e6f7g" # paste your login generated by Mailtrap
password = "1a2b3c4d5e6f7g" # paste your password generated by Mailtrap
sender_email = "mailtrap@example.com"
receiver_email = "new@example.com"
message = MIMEMultipart("alternative")
message["Subject"] = "multipart test"
message["From"] = sender_email
message["To"] = receiver_email
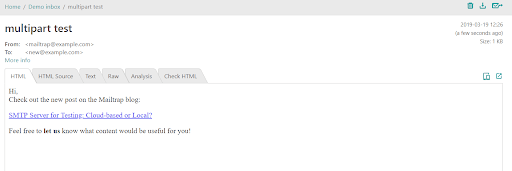
# write the plain text part text = """\ Hi, Check out the new post on the Mailtrap blog: SMTP Server for Testing: Cloud-based or Local? https://blog.mailtrap.io/2018/09/27/cloud-or-local-smtp-server/ Feel free to let us know what content would be useful for you!"""
# write the HTML part html = """\ <html> <body> <p>Hi,<br> Check out the new post on the Mailtrap blog:</p> <p><a href="https://blog.mailtrap.io/2018/09/27/cloud-or-local-smtp-server">SMTP Server for Testing: Cloud-based or Local?</a></p> <p> Feel free to <strong>let us</strong> know what content would be useful for you!</p> </body> </html> """
# convert both parts to MIMEText objects and add them to the MIMEMultipart message
part1 = MIMEText(text, "plain")
part2 = MIMEText(html, "html")
message.attach(part1)
message.attach(part2)
# send your email with smtplib.SMTP("smtp.mailtrap.io", 2525) as server: server.login(login, password)
server.sendmail( sender_email, receiver_email, message.as_string() )
print('Sent')
|
Output:
Sending Emails with Attachments in Python #
The next step in mastering sending emails with Python is attaching files. Attachments are still the MIME objects but we need to encode them with the base64 module. A couple of important points about the attachments:
- Python lets you attach text files, images, audio files, and even applications. You just need to use the appropriate email class like email.mime.audio.MIMEAudio or email.mime.image.MIMEImage. For the full information, refer to this section of the Python documentation.
- Remember about the file size: sending files over 20MB is a bad practice. In transactional emails, the PDF files are the most frequently used: we usually get receipts, tickets, boarding passes, order confirmations, etc. So let’s review how to send a boarding pass as a PDF file.
Input:
1 2 3 4 5 6 7 8 9 10 11 12 13 14 15 16 17 18 19 20 21 22 23 24 25 26 27 28 29 30 31 32 33 34 35 36 37 38 39 40 41 42 43 44 45 46 47 48 49 50 51 52 53 54 55 | import smtplib
# import the corresponding modules
from email import encoders
from email.mime.base import MIMEBase
from email.mime.multipart import MIMEMultipart
from email.mime.text import MIMEText
port = 2525
smtp_server = "smtp.mailtrap.io"
login = "1a2b3c4d5e6f7g" # paste your login generated by Mailtrap
password = "1a2b3c4d5e6f7g" # paste your password generated by Mailtrap
subject = "An example of boarding pass"
sender_email = "mailtrap@example.com"
receiver_email = "new@example.com"
message = MIMEMultipart()
message["From"] = sender_email
message["To"] = receiver_email
message["Subject"] = subject
# Add body to email
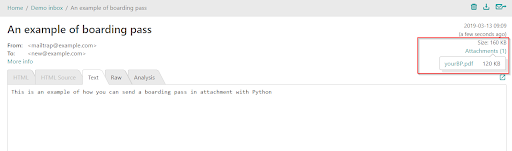
body = "This is an example of how you can send a boarding pass in attachment with Python"
message.attach(MIMEText(body, "plain"))
filename = "yourBP.pdf"
# Open PDF file in binary mode
# We assume that the file is in the directory where you run your Python script from
with open(filename, "rb") as attachment:
# The content type "application/octet-stream" means that a MIME attachment is a binary file
part = MIMEBase("application", "octet-stream")
part.set_payload(attachment.read())
# Encode to base64
encoders.encode_base64(part)
# Add header
part.add_header(
"Content-Disposition",
f"attachment; filename= {filename}",
)
# Add attachment to your message and convert it to string
message.attach(part)
text = message.as_string()
# send your email
with smtplib.SMTP("smtp.mailtrap.io", 2525) as server:
server.login(login, password)
server.sendmail(
sender_email, receiver_email, text
)
print('Sent')
|
Output:
To attach several files, you can call the message.attach() method several times.
How to send an email with image attachment #
Images, even if they are a part of the message body, are attachments as well. There are three types of them: CID attachments (embedded as a MIME object), base64 images (inline embedding), and linked images.
Let’s jump to examples.
For adding a CID attachment, we will create a MIME multipart message with MIMEImage component:
1 2 3 4 5 6 7 8 9 10 11 12 13 14 15 16 17 18 19 20 21 22 23 24 25 26 27 28 29 30 31 32 33 34 35 36 37 38 39 40 41 42 43 44 45 46 | # import all necessary components
import smtplib
from email.mime.text import MIMEText
from email.mime.image import MIMEImage
from email.mime.multipart import MIMEMultipart
port = 2525
smtp_server = "smtp.mailtrap.io"
login = "1a2b3c4d5e6f7g" # paste your login generated by Mailtrap
password = "1a2b3c4d5e6f7g" # paste your password generated by Mailtrap
sender_email = "mailtrap@example.com"
receiver_email = "new@example.com"
message = MIMEMultipart("alternative")
message["Subject"] = "CID image test"
message["From"] = sender_email
message["To"] = receiver_email
# write the HTML part
html = """\
<html>
<body>
<img src="cid:Mailtrapimage">
</body>
</html>
"""
part = MIMEText(html, "html")
message.attach(part)
# We assume that the image file is in the same directory that you run your Python script from
FP = open('mailtrap.jpg', 'rb')
image = MIMEImage(fp.read())
fp.close()
# Specify the ID according to the img src in the HTML part
image.add_header('Content-ID', '<Mailtrapimage>')
message.attach(image)
# send your email
with smtplib.SMTP("smtp.mailtrap.io", 2525) as server:
server.login(login, password)
server.sendmail(
sender_email, receiver_email, message.as_string()
)
print('Sent')
|
Output:
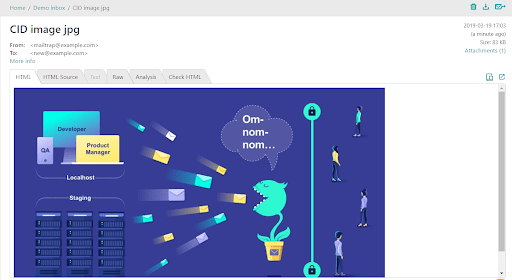
The CID image is shown both as a part of the HTML message and as an attachment. Messages with this image type are often considered spam: check the Analytics tab in Mailtrap to see the spam rate and recommendations on its improvement. Many email clients - Gmail in particular - don’t display CID images in most cases. So let’s review how to embed a base64 encoded image.
Here we will use base64 module and experiment with the same image file:
1 2 3 4 5 6 7 8 9 10 11 12 13 14 15 16 17 18 19 20 21 22 23 24 25 26 27 28 29 30 31 32 33 34 35 36 37 38 39 | # import the necessary components first
import smtplib
from email.mime.text import MIMEText
from email.mime.multipart import MIMEMultipart
import base64
port = 2525
smtp_server = "smtp.mailtrap.io"
login = "1a2b3c4d5e6f7g" # paste your login generated by Mailtrap
password = "1a2b3c4d5e6f7g" # paste your password generated by Mailtrap
sender_email = "mailtrap@example.com"
receiver_email = "new@example.com"
message = MIMEMultipart("alternative")
message["Subject"] = "inline embedding"
message["From"] = sender_email
message["To"] = receiver_email
# We assume that the image file is in the same directory that you run your Python script from
encoded = base64.b64encode(open("mailtrap.jpg", "rb").read()).decode()
html = f"""\
<html>
<body>
<img src="data:image/jpg;base64,{encoded}">
</body>
</html>
"""
part = MIMEText(html, "html")
message.attach(part)
# send your email
with smtplib.SMTP("smtp.mailtrap.io", 2525) as server:
server.login(login, password)
server.sendmail(
sender_email, receiver_email, message.as_string()
)
print('Sent')
|
Output:
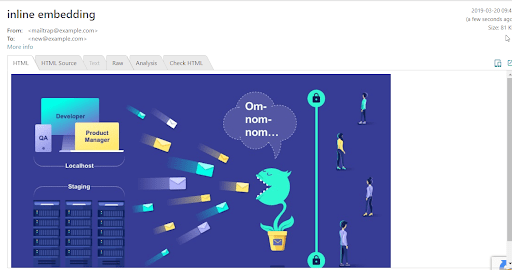
Now the image is embedded into the HTML message and is not available as an attached file. Python has encoded our jpg image, and if we go to the HTML Source tab, we will see the long image data string in the img src.
How to Send Multiple Emails #
Sending multiple emails to different recipients and making them personal is the special thing about emails in Python.
To add several more recipients, you can just type their addresses in separated by a comma, add CC and BCC. But if you work with a bulk email sending, Python will save you with loops.
One of the options is to create a database in a .csv format (we assume it is saved to the same folder as your Python script).
We often see our names in transactional or even promotional examples. Here is how we can make it with Python.
Let’s organize the list in a simple table with just two columns: name and email address. It should look like the following example:
1 2 3 | #name,email
John Johnson,john@johnson.com
Peter Peterson,peter@peterson.com
|
The code below will open the file and loop over its rows line by line, replacing the {name} with the value from the “name” column.
Input:
1 2 3 4 5 6 7 8 9 10 11 12 13 14 15 16 17 18 19 20 21 22 23 24 25 26 | import csv, smtplib
port = 2525
smtp_server = "smtp.mailtrap.io"
login = "1a2b3c4d5e6f7g" # paste your login generated by Mailtrap
password = "1a2b3c4d5e6f7g" # paste your password generated by Mailtrap
message = """Subject: Order confirmation
To: {recipient}
From: {sender}
Hi {name}, thanks for your order! We are processing it now and will contact you soon"""
sender = "new@example.com"
with smtplib.SMTP("smtp.mailtrap.io", 2525) as server:
server.login(login, password)
with open("contacts.csv") as file:
reader = csv.reader(file)
next(reader) # it skips the header row
for name, email in reader:
server.sendmail(
sender,
email,
message.format(name=name, recipient=email, sender=sender)
)
print(f'Sent to {name}')
|
After running the script, we get the following response:
1 2 3 4 | >>>
Sent to John Johnson
Sent to Peter Peterson
>>>
|
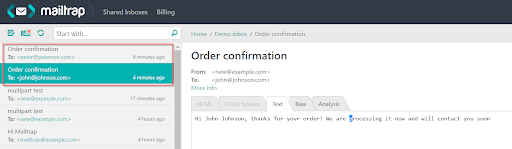
Output:
In our Mailtrap inbox, we see two messages: one for John Johnson and another for Peter Peterson, delivered simultaneously:
Sending emails with Python via Gmail #
When you are ready for sending emails to real recipients, you can configure your production server. It also depends on your needs, goals, and preferences: your localhost or any external SMTP.
One of the most popular options is Gmail so let’s take a closer look at it.
We can often see titles like “How to set up a Gmail account for development”. In fact, it means that you will create a new Gmail account and will use it for a particular purpose.
To be able to send emails via your Gmail account, you need to provide access to it for your application. You can Allow less secure apps or take advantage of the OAuth2 authorization protocol. It’s a way more difficult but recommended due to security reasons.
Further, to use a Gmail server, you need to know:
- the server name = smtp.gmail.com
- port = 465 for SSL/TLS connection (preferred)
- or port = 587 for STARTTLS connection.
- username = your Gmail email address
- password = your password.
1 2 3 4 5 6 7 | import smtplib, ssl
port = 465
password = input("your password")
context = ssl.create_default_context()
with smtplib.SMTP_SSL("smtp.gmail.com", port, context=context) as server:
server.login("my@gmail.com", password)
|
If you tend to simplicity, then you can use Yagmail, the dedicated Gmail/SMTP. It makes email sending really easy. Just compare the above examples with these several lines of code:
1 2 3 4 5 6 7 | import yagmail
yag = yagmail.SMTP()
contents = [
"This is the body, and here is just text http://somedomain/image.png",
"You can find an audio file attached.", '/local/path/to/song.mp3'
]
yag.send('to@someone.com', 'subject', contents)
|
Next steps with Python #
We have demonstrated just basic options of sending emails with Python, to describe the logic and a range of its capabilities. To get great results, we recommend reviewing the Python documentation and just experimenting with your own code!
There are a bunch of various Python frameworks and libraries, which make creating apps more elegant and dedicated. In particular, some of them can help improve your experience with building emails sending functionality:
The most popular frameworks are:
- Flask, which offers a simple interface for email sending— Flask Mail.
- Django, which can be a great option for building HTML templates.
- Zope comes in handy for a website development.
- Marrow Mailer is a dedicated mail delivery framework adding various helpful configurations.
- Plotly and its Dash can help with mailing graphs and reports
Also, here is a handy list of Python resources sorted by their functionality.
Good luck and don’t forget to stay on the safe side when sending your emails!
This article was originally published at Mailtrap’s blog: Sending emails with Python.
Other Tutorials (Sponsors)
This site generously supported by DataCamp. DataCamp offers online interactive Python Tutorials for Data Science. Join over a million other learners and get started learning Python for data science today!

View Comments